Tuesday 31 January 2012

Keeping it cool

Antec TriCool (80mm)
Remember we said we were going to get some extra fans, with blue LEDs?  The first one is called an Antec TriCool (the same brand as the case).  It fits on the side panel and will help to keep the CPU cool.  The other one is made by Zalman and is a little larger.  It fits inside the front of the case.  The photo here is the Antec - the Zalman looks pretty much the same. We're not sure whether the computer will sound like a jumbo jet with all these fans, but I guess we'll find out soon enough.


The most important thing about fans is to get the right diameter for the place you want to attach it to the case - the Antec is 80mm diamaeter and the Zalman 92mm.  We would have got them both the same brand, except that we couldn't find an Antec LED fan at 92mm. Both fans will pull air into the case - the bigger fan that came already installed in the back of the case will push air out.

Fitting them was a little fiddly.  First, the Antec didn't have any arrows on showing which way the air would flow, so we had to use a little guesswork.  Second, the Zalman came with very stretchy silicone pins, which were supposed to go through the holes in the case and then through the fan - all helping to keep noise down apparently.  Well, the pins were never going to fit through the holes in our case.  Luckily the case itself had come with some extra screws, just for fitting fans, so we used those instead. 

Saturday 28 January 2012

Don't forget the memory

Apart from the processor the main bits that need installing on the mobo are the memory modules, and here is what we got for those.  What a great name - Vengeance!  Anyway, there are two of these units in the box.  Each one has its own heatsink, which I guess is why they look like a comb.  I'm not sure how much power they need - we should find out.  Each module has 4 Gigabytes of memory, so we will have 8 Gigabytes altogether.  That sounds like a lot, and should help our computer do complicated things.  Wish I had that much memory!  Why this particular choice?   It was recommended on Amazon for use with the Core i3 processor.  Perhaps we could have got away with less than 8 Gigabytes, but at only £38 we hope it's a good investment.


One of the two modules
Memory modules, still boxed up


Getting to the heart of the matter

The processor arrived today, less than 24 hours after placing the order - you've gotta love Amazon Prime!  As you can see, the box isn't very large, and inside there are two main pieces of kit: the processor itself and a heatsink/fan unit.
The processor, all boxed up
Intel Core i3
Heatsink/fan (bottom side)
Heatsink/fan (top side)


The processor we chose is an Intel Core i3. To be precise, the i3-2100. It's part of Intel's family of processors called Sandy Bridge, which hit the shelves in 2011. We need to be careful handling it, so in the photo it's still in its protective case. If you're wondering how big it is, about 4cm square. 

Remember what we said about fans and heat? Well, it's the processor where a lot of that heat comes from, so it has its very own fan. Not only that, but it has a heatsink too (bottom left in the photos).  The three black stripes in the middle are called "thermal paste" - they will stick the heatsink to the processor and it's important not to touch them, so for the moment we've left the heatsink in its protective pacakge.  The heatsink "spreads" the heat away from the processor and then the fan will get rid of it completely. 

This processor is rated at 65 Watts - remember our power supply was 430 Watts so that's OK for the moment.  And finally, remember our mobo had a 1155 socket for the processor?  The gold parts of the processor that you can see are in fact hundreds of tiny electrical contacts - 1155 of them altogether!  Perhaps there is some sense to this geek-speak after all.


Friday 27 January 2012

What steps are we planning next?

We've ordered the processor and memory - more on those soon.  When they arrive we should be able to install them on the motherboard (or "mobo" as we geeks call it) and then install the mobo in the case.  Before any of that happens, let's take a look inside the case.

Looking inside the case
Here, you can see inside the case.  We've removed one of the side panels and it's lying on its other side. The back of the case is nearest to us.  The power supply fits in the case at the bottom left of this picture - it's held in place with four screws. The fan that you can see in the back of the case was already installed when we got it. At the back of the photo, you can see the inside of the front of the case. The two square meshed areas are where you can install extra fans - we'll probably install one fan here. The metal box in the top left of the picture is where you install DVD drives and the like.  We haven't got to that stage yet.  The mobo will be attached to the side panel that you can't remove.  Finally, what about those wires you can see inside the case?  They were already installed in the case when we got it and we think they will connect to the mobo to make sure things like the on-off switch and the ports on the front panel work properly. 

Monday 23 January 2012

The Mobo's here!

Got the motherboard two days ago.  That's "mobo" in geek-speak. I guess now that we're building our own computer, we need to learn more of this geek-speak stuff.

The mobo we bought was a Gigabyte brand: Z68XP-UD3.  We liked it because it has 10 USB ports and two firewire ports which we want to use for video editing.  And a very colourful box!  We haven't unpacked it yet, because mobos could be damaged with too much clumsy handling - we'll probably wait until we're ready to install the processor and memory.

The mobo box
Why this particular mobo? Even this one brand has dozens of different mobos.  This was one of the cheapest that came with firewire, and it also has a good range of expansion slots that we may want to use later on.  The most important thing seems to be to make sure the mobo has the right socket on it for the processor you want - we are planning to use an Intel Core i3, and the socket the mobo needs for that is called an 1155.  We're getting the hang of this geek speak ....


Tuesday 17 January 2012

The first step - here's the box

We chose our case.  An Antec NSK6582B.  It's a midi-tower case, which is a good compromise between a full tower and a micro case.  It should be plenty big enough for all the hardware we need.  We looked at a few other options before deciding on this particular one.  The Antec Three Hundred case gets good reviews too, but didn't come with a power supply.  Another brand we considered is Lian Li, who make lovely looking cases, but they were a bit pricey for us.

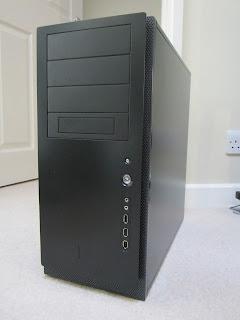
Front panel of the case

I suppose you could say "a black one" as opposed to a silver one.  But what else makes it special?  It has space for five hard drives inside and four more on the outside!  And it comes with a power supply that is good on energy efficiency.  A lot of cases come without a power supply, and it was cheaper to buy case and power supply together.  The one we have will supply up to 430 Watts.  This isn't huge but should be enough for what we want - we'll keep a running total of power consumption as we go.

The panel on the back has holes for only a few USB ports, but our "mobo" comes with a panel to replace it and, as we reported on the mobo post, that panel has 10 USB ports and a firewire ports.  The case itself has also a firewire port on the front, which is going to be really handy for working with all those mini-DV tapes at the back of the cupboard.

We think the front of the case looks really cool - when we get a DVD drive, we'll have to make sure it matches. It comes with one fan (12cm) and also has space for extra fans. We're planning to buy some LED fans that emit a blue light.  We think that will look really cool!!!  I'll report back when we decide which fans exactly. 
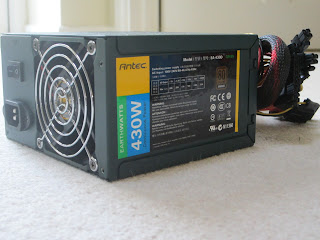
The power supply
Why fans, you might ask though.  Fans are needed in a computer to keep the components cool. Overheating may cause your computer to crash. Even if that doesn't happen, you will probably shorten the lifespan of your computer considerably if you don't keep the components cool. (And, no, wafting it with a newspaper occasionally doesn't help!)

And how do computers get hot in the first place?  All that hard(ware) work in there generates some heat! Look at this forum about computers where someone explained it in a bit more detail.

Finally, why start with the case?  No big reason, but it's help you get excited about what you'll have at the end!

So far, so good

We're using a book called the Haynes Guide to Building Your Own Computer. We borrowed it from the library. Maybe we need to buy a copy, soon.  It's not up-to-date with all the latest components, but it's great at showing you what's involved, and makes you really believe that it's not too difficult.  Here's the Amazon link to get your own.

Share